Spaceflight enthusiast guides
6 parts of a Falcon 9 you can spot in launch photos
Published (UTC)
A Falcon 9 launch photo gives you more to look at than a bright plume. The long cylinder, wider nose and small folded structures belong to different systems. Once you can place them, a launch broadcast becomes easier to follow, especially when the camera switches from the departing rocket to the returning booster.
This guide uses a Falcon 9 carrying a payload fairing, the familiar enclosing shell used for many satellite launches. Dragon missions have a different arrangement at the top. These are six selected components, not six rocket types. Lighting, camera angle and flight phase determine which ones you can actually see.
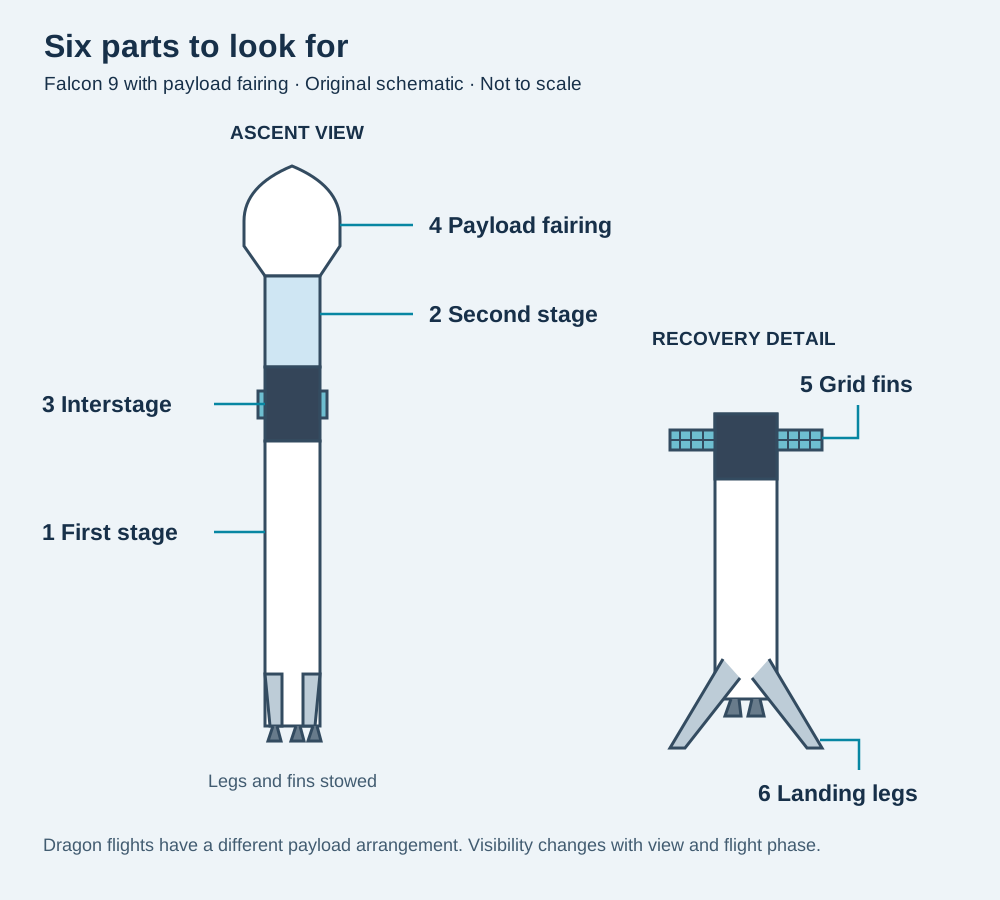
1. First stage: start with the long lower body
The first stage is the large lower portion of the rocket. SpaceX's payload guide describes it as the section with nine Merlin engines. In a distant liftoff photograph, you will usually recognize the overall body before you can resolve individual engines. Plume glare can hide the base completely. Source: Falcon user's guide.
Photo clue: follow the long body downward from the interstage. In recovery footage, the returning booster is this stage with its associated recovery hardware. Do not treat a landing image as a picture of the entire rocket that carried the payload upward.
2. Second stage: the shorter section above the interstage
The second stage continues the payload's journey after separation from the first stage. It uses a single Merlin Vacuum engine. Before separation, that engine is hidden inside the interstage region, so a normal side-on pad photo will not show the familiar large engine nozzle clearly. Source: Falcon user's guide.
Photo clue: identify the fairing and interstage first, then look at the section between them. An onboard view after staging can be a much better place to learn the second stage's shape than a hazy photograph taken from miles away.
3. Interstage: the connector with an easy-to-spot location
The interstage connects the two stages and contains the separation interface. It remains attached to the first stage. Its darker appearance on familiar Falcon 9 configurations makes the region a useful landmark, but location is the stronger clue: it sits between the first-stage tank section and the second stage. Source: Falcon user's guide.
Photo clue: use the contrast to find the region, then confirm it against the vehicle's geometry. Shadows, soot and exposure settings can all change how light or dark a surface looks. Color alone is a weak identification method.
4. Payload fairing: the shell around the cargo
The fairing is the widened, tapered enclosure at the top of this configuration. It protects the payload during the atmospheric portion of ascent and separates later in flight. SpaceX distinguishes this arrangement from Falcon 9 flights carrying Dragon. Source: Falcon user's guide.
Photo clue: look for the nose that is wider than the main body. If a photo shows a Dragon capsule instead, stop applying this particular silhouette guide at the top. A different nose does not mean the lower vehicle is a different Falcon rocket family.
5. Grid fins: small shapes with a clearer recovery view
Grid fins sit near the top of the first stage and help guide it during atmospheric descent. NASA's Falcon 9 landing sequence shows their deployment and aerodynamic-guidance role. They are stowed during ascent, so the lattice-like shapes are easier to recognize in close recovery footage than in many liftoff photos. Source: NASA's launch and landing guide.
Photo clue: look high on the returning booster. Depending on the viewing angle, one fin may overlap the body or another fin. Counting only the visible shapes is not a reliable count of the installed hardware.
6. Landing legs: folded at launch, obvious near touchdown
The landing legs attach near the base of the first stage. They remain stowed for ascent and deploy for landing. NASA identifies the legs and grid fins as elements of the booster recovery system. Source: NASA Commercial Crew press kit.
Photo clue: on the pad, look for long folded shapes along the lower body. Near touchdown, look for the wide stance around the base. The deployed legs belong in a landing view, not a reconstruction of how the rocket looked while leaving the pad.
Try this with the next photo
Write down the mission, date, configuration and flight phase first. Then label only the parts the image actually resolves. “Hidden by the plume” is a better annotation than a confident arrow to the wrong object.
Continue with LaunchDetect Academy's spaceports and orbits lesson, or open the launch archive to explore a mission's published record. A thermal observation may support an event interpretation; it does not resolve all six components in this photo guide.
